Shower waterproofing can get confusing fast.
This is especially true with cement board.
It gets harder with a multi-function shower system.
Every valve, fitting, and pipe needs a clean layout.
It also needs a safe way to block water.
The big mistake is trusting tile alone.
Tile and grout are not the waterproof layer.
The waterproof layer must be behind the tile.
That layer protects the wall framing.
It also protects the back side of the shower.
Question: How Do You Waterproof Around Shower Fittings?
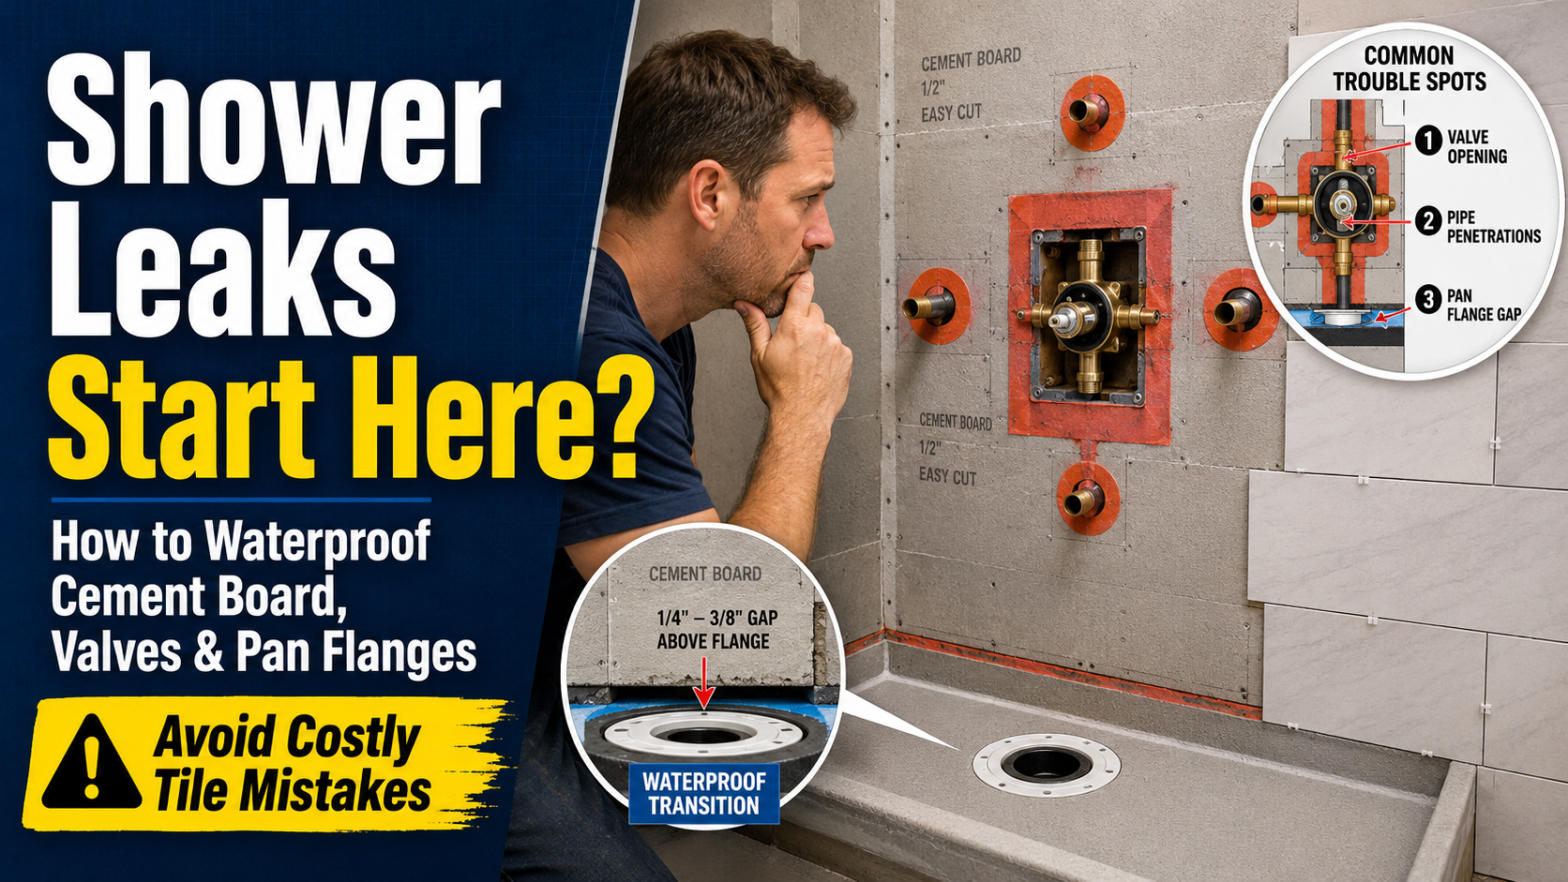
Use a full waterproofing system over the cement board.
Then seal each pipe and valve opening with approved seals.
Do not depend only on the trim plate.
Cement board is a good tile base.
But it still needs waterproofing in a shower.
A liquid membrane or sheet membrane is commonly used.
Examples include USG Durock Liquid Waterproofing Membrane.
You can also review shower waterproofing basics from Oatey.
For round pipe openings, use pipe seals when possible.
For valve bodies, use a valve seal or membrane patch.
Many systems sell matching seals for this job.
Keep the valve plaster guard in the right position.
The finished tile should meet the valve maker’s depth range.
That detail matters with 3-function shower valves.
Since the back wall is open, test everything first.
Check every joint before closing the wall.
Run water through each shower function.
Look for leaks from the back side.
This is much easier before the tile is installed.
What About The Shower Pan Flange?
The cement board should usually stop above the flange.
A common gap is about 1/8 inch.
Follow the shower pan maker’s instructions first.
Do not force cement board over the flange.
That can make the wall bow out.
Bowed walls make large tiles harder to set.
With 12×24 tiles, flat walls matter a lot.
Do not pack that flange gap with hard thinset.
Thinset is not a flexible sealant.
Movement can crack a hard-filled joint.
A better plan is to bridge the area correctly.
Use the waterproofing method approved by your membrane maker.
That may be a membrane band, sealant, or fabric tape.
Use only products made to work together.
At the finished tile-to-pan joint, use silicone sealant.
Use 100 percent silicone made for wet areas.
Do not block drain paths or weep areas.
Simple Rule To Follow
Build one continuous waterproof layer.
Seal every hole before tile goes on.
Keep the pan flange joint flexible.
That simple plan prevents many shower leaks.
It also makes the tile job last longer.
I’m Chris Mayer, writing for Plumbing 101.
